The time has come for me to rebuild my lab after a good few months so I’ve been trashing and rebuilding all over the place. While building something, I blog about any issues hit but sometimes, there isn’t enough time and you miss a post or two. This blog post is to correct one of such misses. As I had a chance, I recreated some of the issues I remembered for SSO (Single Sign On) the first time round and took screenshots for this post. So, here are the most common issues/pitfalls for SSO, that I have seen/heard or read about.
1. Error: “Database Connection has failed. You can refer…”
The full error message is:
Database connection has failed. You can refer to the vm-sso-javaLib.log in the system temporary folder for more information.
This happens when you are on the “Database Information” screen and have entered all the information e.g. shown in the screenshots and clicked “Next”.

If only we had paid attention to the previous screen and not clicked “Next” too quickly. The previous screen clearly states that we need to create a database with a few compulsory tables before proceeding. A screenshot for reference:

Here is a reminder of what needs to happen:
- Logon to the server where the database is due to reside. You must be a SQL Admin to perform these steps. Fire up “SQL Management Studio” and login as a SQL Admin.
- Mount the vCenter ISO/DVD on to that server and go to the location mentioned in screenshot above. Just make sure that you locate the correct DB type e.g. mssql, oracle etc. It’s “mssql” in my case. Run the script “rsaIMSLiteMSSQLSetupTablespaces.sql”.
- Edit the script in three places to point the three files to the correct location i.e. as per your SQL installation. In my case, it was the default path as shown in screenshot:

- Execute the script. If run like this, it should create a database called “RSA” on the SQL server. Refresh to confirm its creation.
- Go to the same folder on the source that contains the SQL scripts and this time, double-click “rsaIMSLiteMSSQLSetupUsers.sql”. Edit in two places to replace < CHANGE DBA PASSWORD> and <CHANGE USER PASSWORD> to passwords of your choosing. Keep the single quotes.

- Execute the script to create the required users and set appropriate permissions on the RSA database. Again, refreshing the console should display these users under “Security –> Logins”.
I should mention at this point that neither the database needs to be named RSA nor the other script needs to have users RSA_DBA and RSA_USER. In fact, if you can create the right tables and users, you can do the whole process manually and with your own names etc. I am just taking the path of least resistance. Why do the work if there are ready-made scripts available!
Once done like this, the installation should carry on nicely, unless you hit this next one….
2. Error: “The specified user does not have sufficient privileges…..”
Full version is this:
The specified user does not have sufficient privileges. Refer to Installation and Setup guide for more details on the privilege requirements.
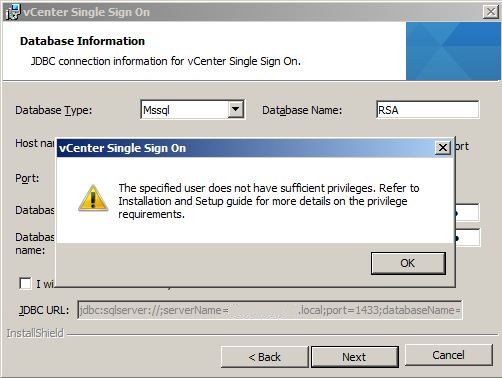
If you hit this, it’s more of a negligence than a problem. If the scripts mentioned in the previous section have been run correctly, then you shouldn’t see that. The most common cause for this is when the RSA_USER and RSA_DBA have been switched when entering the information. While embarrassing (and yes it has happened to me!), it’s an easy mistake to make as normally administrative accounts are created and entered first as a general convention. Also, the second script creates the DBA account first so you’re in that mindset. So, when it’s late night and you’re running on auto-pilot, this is an easy mistake to make!
3. Error 29148. STS Configuration Error:

Occurs right at the end of the installation when you’re almost there. This happens normally to people who want to run services under designated accounts (like me). By default, the following screen comes with “Use network service account” ticked but I like to change such settings to specific accounts.

For reasons still unknown to me (to be honest, I haven’t tried hard to work it out!), it doesn’t like to be told to run under specific accounts and comes up with that error. If left alone with the default, it runs fine and the installation completes without errors. In my case, it’s not actually a problem if it runs under default conditions so I left it at that.
Well, there you have it! These are the three most common issues I have seen or heard about during the installation of SSO. Hope this post will help you save time in case you hit any of these and will also serve as a reminder note to me in case I am running an installation late in the night.
Hope it helps!
Great post – big thanks
Thanks! Much appreciated! 🙂
If the database has been updated from SQL Server Express Edition, it might still be using dynamic port instead of 1433. Look here: http://kb.vmware.com/selfservice/microsites/search.do?language=en_US&cmd=displayKC&externalId=2039092
Nice one! 🙂 Thanks!
Ather, I’ve spent three days fighting silly error messages and issues trying to get a new server set up. Read your short article and it finished installing in five min.
THANK YOU! Been hunting in tech articles and VM support forums for just this info.
Glad to be of service! 🙂 Thanks for the great feedback – this is what makes it all worthwhile.